First-run walkthrough#
This page walks through the first ten minutes after the stack comes up: logging in, creating a project, opening a ticket, writing a wiki page, and pinning a sticky note. It assumes you've completed the quickstart and run make seed-dev.
The seeded data exists so this tour has something to look at. If you'd rather start from an empty workspace, skip the seed and the screens below will simply show empty states instead of populated lists.
1. Log in#
Open http://localhost (or your mapped host). The app redirects to /login when there's no session cookie.
Sign in with the seeded human account:
| Field | Value |
|---|---|
| Username | admin |
| Password | changeme-please |
The backend issues an HttpOnly session cookie scoped to the Caddy origin. Subsequent navigation is authenticated transparently.
Rotate the seeded password before you expose the host
The seed credentials are deliberately weak. Rotate the human password from the app under Settings → Security (/settings/security) — this is the routine path. If the password is lost, recover it from the host with make reset-password USER=admin (see backend/scripts/reset_password.py). Same for the seeded bot tokens — make seed-dev writes known-plaintext values so they can be used immediately, which is fine on localhost and dangerous anywhere else. Rotate bot tokens via Settings → Bots → Rotate token (or POST /bots/{id}/tokens/rotate).
2. The dashboard#
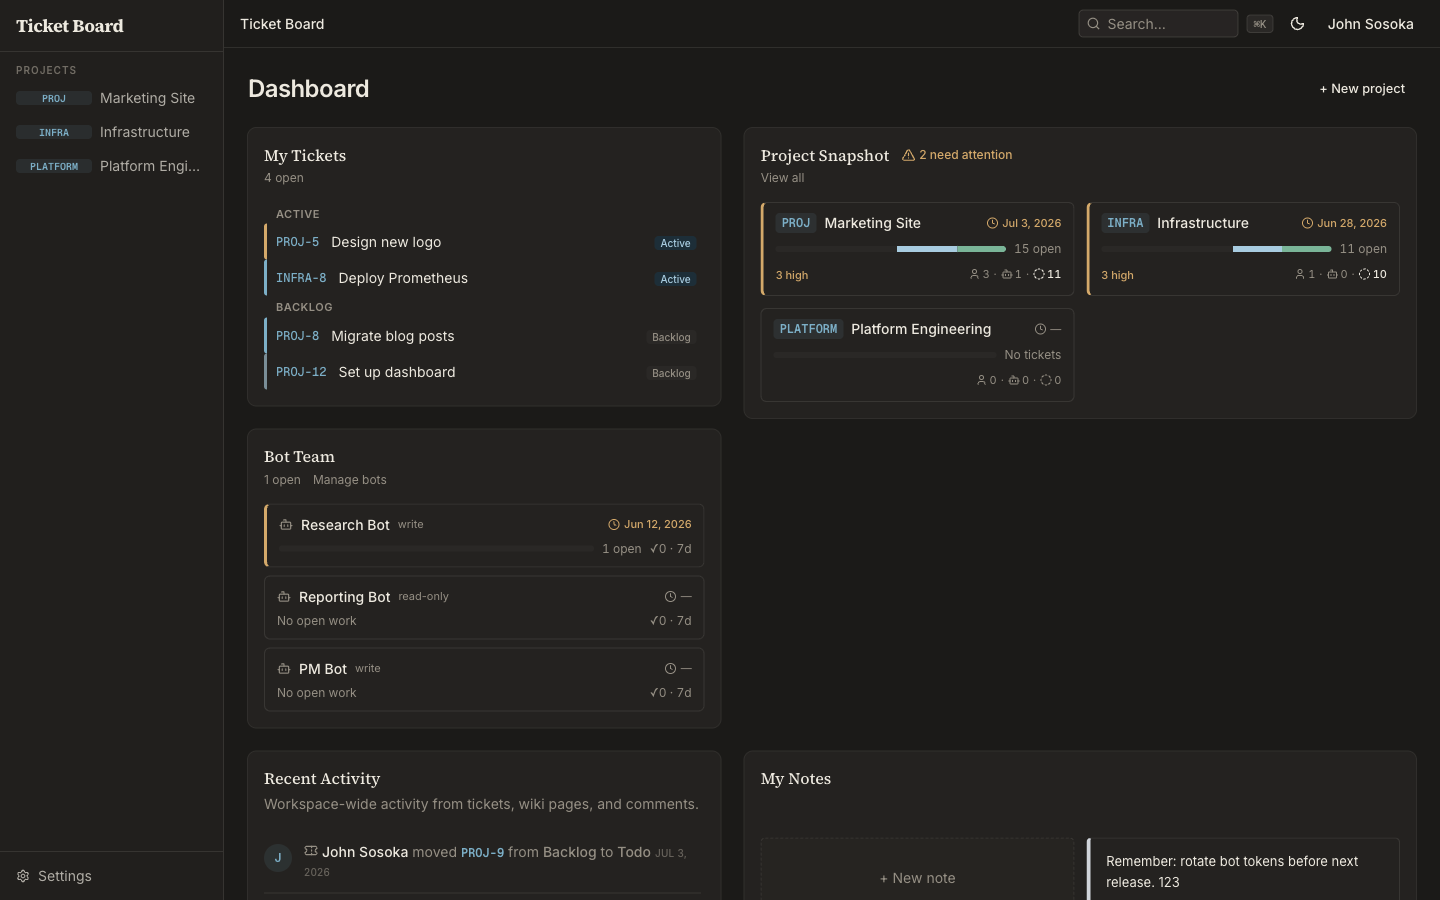
After login you land on the dashboard. Three regions:
- Projects card — the five most recent projects, each rendered as a card with key, name, and a short description. There's a
+ New projectbutton in the header and aView alllink. - Recent activity card — the workspace-wide activity feed, polled every 30 seconds. After
make seed-dev, this card lists the seed's ticket and wiki creations attributed toadmin. - My Notes — your personal sticky notes. The seed gives you two: a reminder to rotate bot tokens and a note about checking vendor pricing.
The left sidebar lists every project in the workspace. The seed populates two: PROJ (Marketing Site) and INFRA (Infrastructure). Hovering the PROJECTS header reveals a + button — that's the second entry point to the "new project" dialog.
3. Create a project#
Click + New project on the dashboard card (or the + in the sidebar header). The Create a project dialog opens.
The form has three fields:
| Field | Notes |
|---|---|
| Key | 2–10 characters. The dialog enforces uppercase letters only; the API additionally accepts digits after the first character (^[A-Z][A-Z0-9]{1,9}$). Used as the ticket display-id prefix (e.g. MKTG-123). Cannot be changed later. The input is monospaced and uppercased as you type. |
| Name | Human-readable project name. Required. Up to 120 characters. |
| Description | Optional. Markdown is supported in the project overview. Up to 500 characters. |
Try creating a project with key DEMO, name Demo project, and a one-line description. The dialog:
- Validates the key against the dialog's
^[A-Z]{2,10}$pattern. Typing lowercase auto-uppercases. Blurring the field with an invalid value surfaces an inline error. - Catches a 409 from the API when the key is already in use and shows the same inline error. The two seeded projects use
PROJandINFRA— those will collide. - On success, toasts
Project DEMO created.and navigates to/projects/DEMO.
The project home page shows a board placeholder (no tickets yet), a wiki tab (also empty), a settings tab, and a sticky-note region scoped to this project.
Why is the key immutable?
The project key is part of every ticket's display ID (DEMO-1, DEMO-2, …). Renaming the key would invalidate every existing ID, every audit-event reference, and every external link. The trade-off is committing to the key up front. Pick something short and project-specific.
4. Open the board#
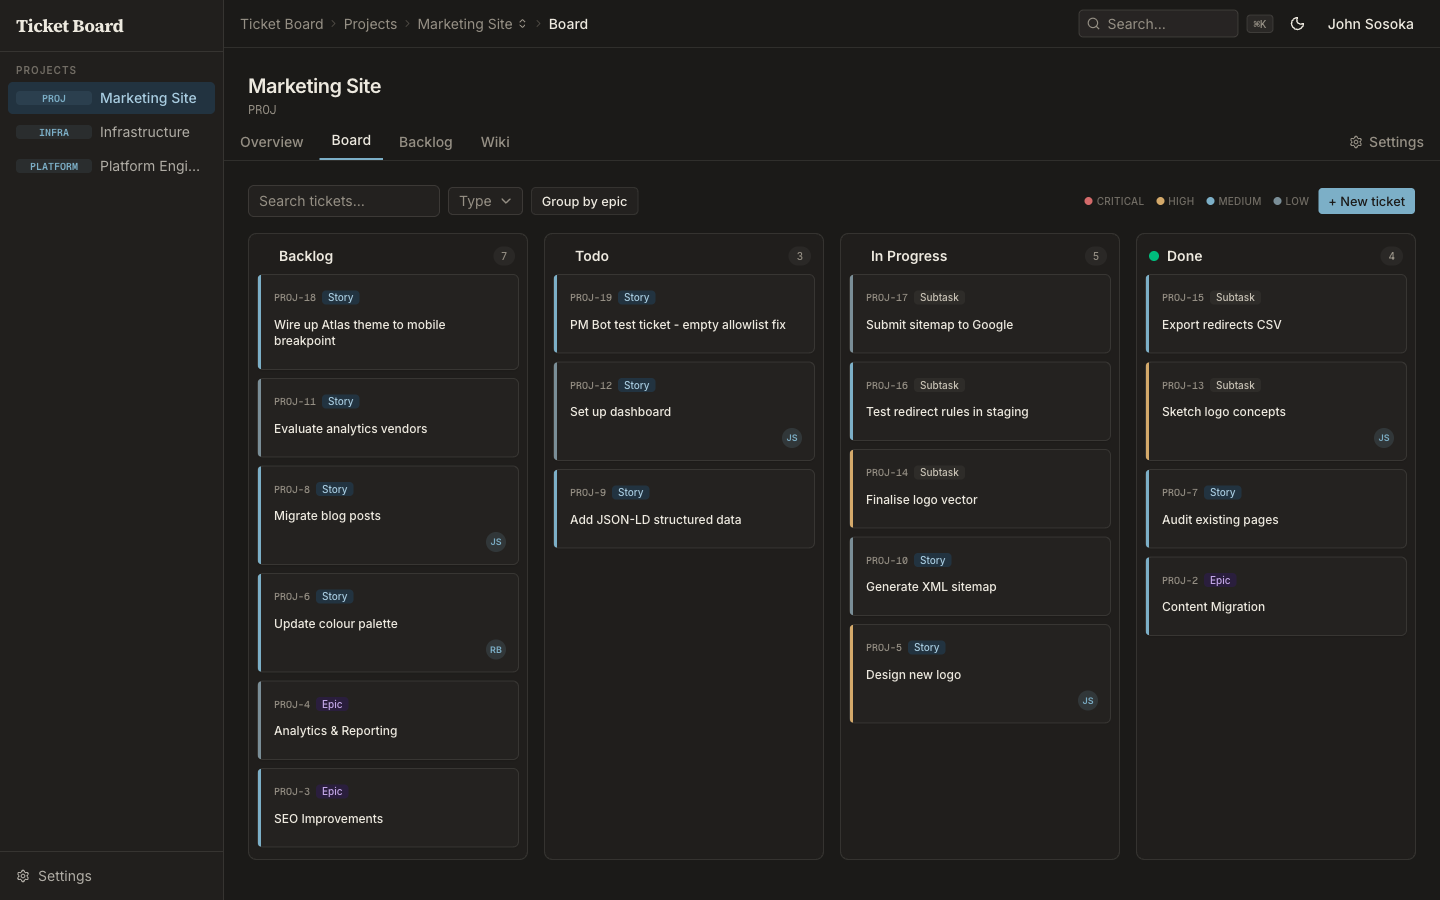
Click PROJ — Marketing Site in the sidebar, then Board. You'll see a Kanban board with four columns (Backlog, Todo, In Progress, Done) populated by the seed. The seed only assigns tickets to Backlog, In Progress, and Done, so Todo starts empty — that's expected.
You can:
- Drag a card between columns to transition its state. The state change is persisted and emitted as a
ticket.state_changedaudit event. - Filter by type, priority, assignee, or label using the filter bar above the columns.
- Open a ticket by clicking its card.
The board endpoint is paginated and ordered. State columns are derived from the project's WorkflowState rows in category order (backlog, active, done). The seed uses the default state set; each project owns its own states and can have them reordered later.
5. Create a ticket#
From the board (or the backlog), click + New ticket. Or, if focus isn't in an editable element, press c. The New ticket dialog opens.
The dialog has a title row, a compact metadata row, an optional parent picker, and a description box.
Type, priority, assignee, due date#
The metadata row holds four selects:
| Control | Purpose |
|---|---|
| Type | epic, story, or subtask. The default is story. Changing type re-evaluates the parent field (see below). |
| Priority | low, medium, high, critical. Each shows a small colour dot in the trigger. Default is medium. |
| Assignee | Any user in the workspace, including bots. Default is Unassigned. |
| Due date | Optional. Stored as a date, not a timestamp. |
Parent picker — conditional#
The parent field's behaviour depends on the ticket type:
| Type | Parent field |
|---|---|
epic |
Hidden. Epics are roots; they can't have parents. |
story |
Visible, optional. A story may belong to an epic. Accepts a display ID like PROJ-1. |
subtask |
Visible, required. A subtask must have a story parent. Submitting without one surfaces an inline error. |
The placeholder text adapts (Parent epic — optional (e.g. PROJ-1) vs. Parent story (e.g. PROJ-3)) and the label gains a red asterisk when required.
Submit#
The Create button is disabled until the title is non-empty and (for subtasks) a parent is set. On success the dialog closes and a toast appears with a View ticket action that jumps to the new ticket's detail page.
Error handling worth knowing:
- 404 — the project went away under you. Toasts
Project not found.. - 422 — the API rejected the request (most commonly a bad parent reference). Toasts
Could not create ticket — check the parent field..
6. The ticket detail page#
Opening a ticket shows three regions:
- Header — title, display ID (
PROJ-5), state pill, type and priority badges, assignee, and a kebab menu for archive, watch/unwatch, and link actions. - Body — the markdown body rendered with the same sanitiser used everywhere. Editable in-place if you have permission.
- Activity & comments — a unified timeline showing comments, transitions, assignments, label changes, and any other write event. This timeline is
GET /audit?category=activity&ticket_id=...— the activity feed is a filter on the same audit table that backs the workspace audit log.
The comment composer at the bottom uses the wiki render profile, so [[wikilinks]] and most markdown work inline. Comments are editable and soft-deletable by their author.
7. Write a wiki page#
Switch to the project's Wiki tab (or the global wiki under the workspace nav). The seed gives PROJ three pages — Getting Started, Design System, and Content Style Guide — plus an INFRA page with a deliberately broken link.
Click + New page. The New page dialog opens. It's intentionally small: title, derived slug, scope.
Title → derived slug#
The title input is a serif "writing a document title" field. As you type, the slug below it auto-derives — lowercase, hyphenated, capped at 80 characters, then stripped of leading/trailing dashes.
For example, typing On-call Rotation Policy derives the slug on-call-rotation-policy.
Custom slug (progressive disclosure)#
Hovering the derived slug reveals an Edit slug link. Click it to edit the slug directly. Constraints:
- Lowercase letters, digits, and hyphens only, starting with a letter or digit — pattern
^[a-z0-9][a-z0-9-]*$. - A custom slug is marked
(custom)next to the preview and will not regenerate when the title changes. - A
Resetlink reverts to the auto-derived slug.
If the API returns 409 on submit, the dialog surfaces A page with that slug already exists. Try another. in place of the slug error.
Scope#
A radio group below the slug picks where the page lives:
- Global wiki — workspace-level reference. Anyone in the workspace can read; only humans (and bots with
can_edit_global_wiki=true) can write. - Per-project — one entry per project in the workspace. Project-scoped pages are listed under that project's wiki tab and contribute backlinks only within that project.
If you opened the dialog from a project wiki, that project is pre-selected.
Submit#
Submitting creates the page and redirects to the editor at /wiki/<slug>/edit (global) or /projects/<key>/wiki/<slug>/edit (project-scoped). The page is created with an empty body; you write the content in the editor. Saves are versioned — every save snapshot lands in wiki_revision.
Wikilinks resolve retroactively
Write See also [[design-system]] in your body and save. If design-system exists, the link renders as a clickable reference and a backlink appears on the target page. If it doesn't exist yet, the link is stored as unresolved and renders with a "broken link" style. When you later create a page with that slug, the existing forward references resolve automatically.
8. Pin a sticky note#
The dashboard's My Notes region (and each project's sticky region) accepts markdown notes. Click the + to add one. Sticky notes use a stricter sanitiser profile than wiki pages — images, tables, top-level headings, and task-list checkboxes are stripped. Wikilinks still resolve to plain links, but without the styling and broken-link badge wiki pages get. They're a scratchpad, not a knowledge base.
Each sticky has a Convert to ticket action that opens a dialog pre-filling the ticket title and body from the note's content and lets you pick a target project. After conversion, the original sticky is deleted and the new ticket gets a comment crediting the sticky's origin.
9. Try a bot#
The seed wires up two bots. The research bot has write access to both projects; the reporting bot has read access to INFRA only. Both authenticate with their plaintext token (returned by make seed-dev).
The simplest REST call:
You should get back a JSON User document with type: "bot", username: "bot-research", and bot_mode: "write".
For MCP, the bot connects to its token-keyed mount:
The token in the path is the credential — anyone with the URL has the bot's authority. Caddy redacts the token segment from its access log before any sink sees it. See the MCP server reference for the full tool catalog and how to point a client at the URL.
Where to go next#
You've now seen the major surfaces. Useful next reads:
- Operator guide → Tickets & boards — the full board UX, including filter syntax, keyboard shortcuts, and the ticket-relation graph.
- Operator guide → Bots — creating real bots, rotating tokens, scoping by project, and the read/write split.
- Operator guide → Webhooks — wiring outbound integrations with signed payloads.
- Deployment → Environment variables — the full configuration surface.
- Architecture → System overview — how the pieces fit together.
If you want to wipe and restart cleanly, jump to Seed data → Resetting the dev database.